In this tutorial we are making ESP8266 web server with HTML web page. ESP8266 connects to WiFi Network and we get web page in our phone and PC which is connected to same WiFi network.
A Web server is a program that uses HTTP (Hypertext Transfer Protocol) to serve the files that form Web pages to users, in response to their requests, which are forwarded by their computers’ HTTP clients.
To implement web server on ESP, there are two ways to make your first web server first connect to your WiFi router or make ESP as access point.
Web Server Step by Step
As we know that all web servers have a web page to be served. First make a web page using HTML and test it on your computer.
Step 1: Create a good looking Web page
Open your note pad and start writing HTML code. Save as index.htm.
1
2
3
4
5
6
7
8
9
10
<HTML>
<HEAD>
<TITLE>My first web page</TITLE>
</HEAD>
<BODY>
<CENTER>
<B>Hello World.... </B>
</CENTER>
</BODY>
</HTML>
1
2
3
4
5
6
7
8
9
10
<HTML>
<HEAD>
<TITLE>My first web page</TITLE>
</HEAD>
<BODY>
<CENTER>
<B>Hello World.... </B>
</CENTER>
</BODY>
</HTML>
<HEAD> and <TITLE> is used to give page title, which is visible in top of the browser.
<CENTER> tag is used for center alignment of text, <B>is used to make text bold.
Test your web page
Open your web page in web browser. You can observe that at the top you see Title “My first web page”. And Web page with Hello World… message.
To see the changes in your HTML code simply change you HTML program and press refresh in browser. It will reflect immediately. This way you can make your webpage test it, then deploy it on ESP8266. It saves your lot of time.
HTML Web Page
Step 2: Creating web server on ESP8266
ESP can acts as access point and it can connect to access point or both.
First we make program to connect to WiFi hot spot (Access Point)
Program to connect to Access point and Make web server
We need these libraries to make web server.
ESP8266WiFi.h is required for doing all WiFi related functionalities such as connection, AP, etc.
WiFiClient.h this file is required to send request to web browser
ESP8266WebServer.h it handles all HTTP protocols
1
2
3
#include <ESP8266WiFi.h>
#include <WiFiClient.h>
#include <ESP8266WebServer.h>
Define your SSID and Password of your WiFi router, where the ESP connects
1
2
3
//SSID and Password of your WiFi router
const char* ssid = "your_ssid";
const char* password = "password";
Web server is on port 80, you can use other ports also, default HTTP port is 80, to open web page with different port number you have to enter port number after IP address. Ex. For port number 81 you have to type 192.168.2.2:81 in browser.
1
ESP8266WebServer server(80); //Server on port 80
There are two ways to make web server one is to connect to WiFi hot spot or make ESP as hot spot (Access Point).
This command is used to connect to your WiFi Access point. The term Access Point (AP) is same as WiFi Hot Spot. If the network is open you can remove password field from command.
1
WiFi.begin(ssid, password); //Connect to your WiFi router
After connection request we wait for WiFi to get connect. ESP8266 once connected and disconnected afterwards due to signal loss or any reason, there is no need to give this command again, it will try to connect again automatically. This is handled by its OS, you may find some stack errors displayed in serial monitor, and these errors come from its internal OS.
1
2
3
4
5
// Wait for connection
while (WiFi.status() != WL_CONNECTED) {
delay(500);
Serial.print(".");
}
To get IP address i.e. assigned to ESP8266 by your WiFi router use this command
1
WiFi.localIP();
When client request a web page by entering ESP IP address which data to be sent is handled by subroutine and that subroutine name is defined in server.on(path,subroutine_name).
1
server.on("/", handleRoot); //Which routine to handle at root location
Example: If you have two pages you can define like this
Server.on(“/”,root); //192.168.2.2 (IP of ESP) this is root location
Server.on(“/page1”,First_page); //”192.168.2.2/page1” this is first page location
Server.on(“/page2”,Second_page); //”192.168.2.2/page2” this is second page location
You have three subroutines that handle client requests.
To start the server use this command
1
server.begin(); //Start server
In main loop we handle client request
1
server.handleClient(); //Handle client requests
This subroutine is called when you enter IP address in web browser and hit enter. This routine sends the test “hello from esp8266” to web browser.
1
2
3
void handleRoot() {
server.send(200, "text/plain", "hello from esp8266!");
}
Upload your own HTML code as web page
We have learned how to create web server and its basics, now we want to upload our HTML web page. It’s very simple, just replace “hello from esp8266” with HTML code.
1
server.send(200, "text/plain", "hello from esp8266!");
First we take webpage code in separate header file name it as “index.h”, our web page is now a array of characters stored in variable MAIN_page. Do not use comments in this file. It is HTML data as a character array not a program. Now HTML code is in a header file .h not .html file.
index.h file
1
2
3
4
5
6
7
8
9
10
11
12
const char MAIN_page[] PROGMEM = R"=====(
<HTML>
<HEAD>
<TITLE>My first web page</TITLE>
</HEAD>
<BODY>
<CENTER>
<B>Hello World.... </B>
</CENTER>
</BODY>
</HTML>
)=====";
Now we import this header file in our program using #import “index.h”. Make sure that this file must be with arduino code file .ino
The changes in main programs are made in handleRoot subroutine which sends the web page to client, now we are sending html page change text/plain to text/html.
1
2
3
void handleRoot() {
server.send(200, "text/plain", "hello from esp8266!");
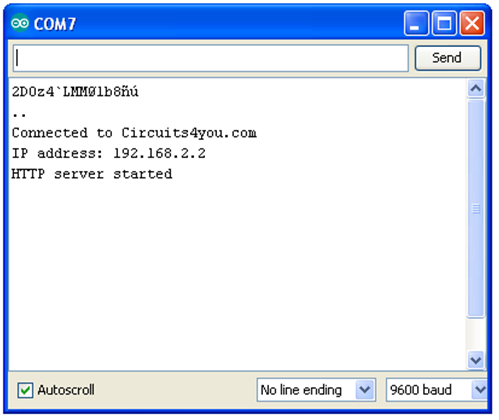
To see the result first get the IP address from serial monitor, Open serial monitor and press reset. It sends IP and shows its connection status, if it is not able to connect it will show “……..” dots in serial monitor. Check you ssid and password.
1
2
3
//SSID and Password of your WiFi router
const char* ssid = "your_ssid";
const char* password = "password";
Once connected it will show following
Connection IP Assigned
Open web browser and enter this IP (192.168.2.2), to use domain name read this post, Make sure that your laptop or phone must be connected to the same network. You can see this web page which is we have created in all the devices which are connected to the WiFi router, where the ESP8266 is connected.